Pages

Wednesday, March 31, 2010

UnniAppam -Small Ricecake

Dear Friends,you know this is my 50th post. I am so happy because i got a good chance to share some of my cooking experiences with you through this blogging and also i got so many culinary ideas from my fellow bloggers..And i am sure i reached upto this 50th post not only because of my efforts but also the support i got from my fellow bloggers and readers.I am thankful to each and everyone who came here and spent their valuable time to read and leave their comments on each post.
Another good news is that my fellow blogger Nithu added me in her latest guest post.If you have time pls visit here
http://www.nithubala.com/2010/03/guest-post-4-todays-guest-prani.html
Today i am going to celebrate my 50th post by sharing with you something special. It is a Kerala's favorite snack: "Unniappam". Unni in malayalam means small..So it means small appam (ricecake)..
When we moved to US, i couldn't prepare this snack because I didn't bring that mould (appa-chatty). Yes, we need a special mould for preparing this dish ..I was searching for something similar to appa-chatty here in different shops but i didn't get one. One day I happened to see an ad on TV about Pan-Cake Puff maker. I realized that I can use that one  for preparing Unniappam  ..Finally i got that from Target. This pancake puff maker is exact same as our traditional appam chatti.
I always remember  Sabarimala, vinayaka temple, our festivals like onam and celebrations like wedding while  preparing these kind of snacks..In my school days these were our favorites evening snacks: Unniappam, neyyappam, achappm and PazhamPori...My husband is a big fan of these snacks. Having this kind of snacks is really enjoyable.
cooking time: 30 minutes
Ingredients
kerala kuthari Rice or Rosematta rice: 2 cup
Jaggery: 1 cup
Coconut slices: 5 piece
Ghee: 2 tbsp
Cardamom: 4 nos
Baking powder: 1/4 tsp
Ripe banana: 3 nos
Oil: 5 tbsp
The utensil used 
Unniappam maker(Here i used the Pancake Puff maker)
Preparation

  1. Soak the rice 4-5 hours
  2. Cut the coconut slices into small pieces and fry them into the ghee until get nice brown color
  3. Make a nice powder of the cardamom
  4. Coarse grind the soaked rice ..(add very less amount of water while grinding)
  5. add the jaggery and ripe banana(cut them into small pieces) into the rice mix.and  grind them and make a nice batter.
  6. Add the cardamom powder and coconut pieces into the batter and mix  well
  7. Heat the appa-chatty(PanCake Puff Maker) ,once it get heated add the oil into each well in the mould.
  8. pour the batter into each well and let it fry .. 
  9. once the sides are getting to come out, flip them into other side and fry until nice brown color


  •  Take one by one unniappam from the maker (use a stick)
  •  Place them into a kitchen towel so that u can remove the excess oil from them.
The delicious unniappam is ready to serve..have it with hot tea..
While cooking we may confuse:
About the consistency of the batter.
       The consistency of the batter should be same as the idli batter..While grinding the rice do not add excess water..Once u add the jaggery into the rice mix, it will get loosen,while adding the banana the batter will be come into the right consistency..If u feel the batter is too loose then just add some more rice flour(heat the rice flour before adding)
How much batter should be adding into the appam maker
        Fill wells 3/4 full with batter..otherwise once it get fried it will puff up  and the exact shape won't come.
When to change the side
       While frying u can see the batter is coming out from the well that time using a stick just flip it .
Cook's tip
  • If you use Kerala kuthari/Rosematta rice gives more taste.
  • If you are not adding baking powder,make the batter and keep it for 4-5 hours(for fermentation).then only prepare the unniappam otherwise it won't puff up.
  • You can also use the rice flour .It is easy because no need to soak and grind the rice.
Sending this to sunday snacks-Healthy snacks event hosted by Divya

    ChukkuJeeraChoornam (Dried Ginger-cumin Powder)

    Today i am going to share with  you  a Home remedy.It's really  a good remedy for cough..At the starting stage itself have this "Chukku-jeera choornam" (dried ginger-cumin powder),you will get a good relief.
    Usually our grandparents have these kind of so many home remedies. I always remeber when grandma was with us she used to give such kind of medicines and we hardly go to the doctor's place. The best part of these remedies are they doesn't have  any side effects and we can make these medicines at our home itself.
    For preparing the choornam what u have to do is just make a nice powder of the following ingredients . As per the following measurement you can prepare  6 tsp of powder.change the quantity according to your requirements.
    Ingredients
    Kalkandam(white sugar rock candy): small size
    Cumin seed : 2 tsp
    Dried Ginger: medium size
    Preparation
    Make a nice powder of the 3 ingredients.Use the Mortar and pestle.
    Usage
    Have 1 tsp every 6 hours daily..
    You can keep it in an airtight container for 2-3 weeks. 


    Sending this to Home remedies series -2 event hosted by Ruchika and the event started by A2Zvegetarian cuisine  

    Monday, March 29, 2010

    Puttu and Kadala curry/ Rice Steam cake and Black chickpea curry


    Hope you had a nice weekend...As I haven't posted any breakfast recipes in my blog yet, I am going to start with a traditional kerala recipe: Puttu and KadalaCurry(Steamed rice cake and black chickpea curry)...
    "Puttu" is a traditional kerela breakfast and non-keralites hardly know this dish  and its preparation.why i am saying like that because my non-malayalee friends curiously ask about this puttu..may be because the preparation of this dish is so unique ..It is a very easy to make recipe but it requires a specific mould for the preparation.
    The best combinations with puttu are : payar (moong dal curry); kadala curry  ; pappadam and pazham(ripe banana).My brother used to have the puttu with the egg curry.Thats also a best combination.
    There are two types of puttu mould(Puttu kutty). Hemisphere mould (you can even use coconut shell) and cylinderical mould. I used both the moulds for preparing the Puttu today.. (Traditionally the puttu was prepared using a cylendrical mould ("Puttu Kutty") coming along with a small pot("Puttu Kudam"). Nowadays, we use pressure cooker instead of this pot).I do remember sometimes amma used to prepare the puttu with the idlimaker instead of the puttu-kutty.. Add the flour in each idli plate and just steam it..Within minutes plateful of puttu will be ready.If u are interested u could use the coconut shell as well. Add the grated coconut and flour in the shell and make a hole in the shell (by opening of the eye of the shell).. Place  this into the pressure cooker nozzle and cook..
    Below are the moulds which I used for preparing puttu:

    Let me explain the preparation steps of this steamed rice cake
    Cooking time: 10 minutes
    Ingredients
    Rice Flour: 2 cup
    Grated coconut: 1/4 cup
    salt : to taste
    Water : enough
    Preparation
    Step1: In a pan add the rice flour and heat it for 5 minutes.stir constantly. Remove from heat, and set aside to cool.
    Step2: In a bowl add this flour and sprinkle some water (add salt too) and prepare wet flour. This is an important step. Do not add more water and also make sure that the flour is wet enough.
    Step3: In a pressure cooker boil 2-3 cups of water.
    Step4: In the puttu kutty add the grated coconut and then the flour in layers( in the cylinderical  -add 3 layers of coconut (1-2 tsp)and 2 layers of flour,in the hemishere just one layer if u wish u could add some grated coconut on the top as well)
    Step5: Place the mould on the pressure cooker nozzle(vent pipe). Once the flour is well cooked  you could see the steam coming from puttu mould.let it cook for some more time.(refer the picture below)
    Step6: Remove it from the pressure cooker and with the help of a stick take off  the puttu from the mould.
    The delicious puttu is ready to have..Have it with kadala curry.
    Points to ponder
    • Insted of using the flour..u can soak the rice for 4-5 hour and make the nice powder of it and use that...
    • Heat the flour just before making the puttu.It will help to make the puttu softer.

    Kadala curry(Black Chickpea Curry)
    Black chickpea(kadala):1 cup
    Onion: 1 medium sie
    Tomato: 1 small
    Green chili: 2 nos
    salt : to taste
    ginger: medium sie
    Garlic: 3 pods
    Coconut pieces: 5-10(optional)
    Making the paste
    Grated coconut :1/2 cup
    Chili powder: 1 tsp
    Coriander Powder: 1/2 tsp
    Garam Masala: 1 tsp
    Turmeric Powder:1/2 tsp
    Seasoning
    Oil : 1 tsp
    Mustard seed: 1 tsp
    Redchili: 1 no
    Curry leaves: 1 spring
    Preparation:
    Step1:

    • Heat the pan .Add the grated coconut and fry until golden brown color.Add the chili powder coriander powder garam masala and turmeric powder fry it for 3 minute.Switch off the heat and let the mix to cool..
    • Make a nice paste of the above mixture.Add water accordingly.
    Step2

    • Soak the chickpea in water overnight(otherwise atleast 8-10 hours)
    • Cook the chick pea in 3 cups of water(add salt too)
     Step3

    • Heat oil in a pan,add the sliced onion,Once it get slight brown color add the garlic ginger paste, green chili and coconut piece. sauté well .
    • Add the tomato pieces saute until the oil seperate from the mix.
    • Add the black chickpea saute for sometime
    • Add the coocnut paste and mix it with the chickpeas
    • Add enough water(use the same water  for cooking the chickpea) and cook for 10-15 minutes in medium heat

    Step4

    • Heat oil in another pan..add the mustard seeds ,once the mustards seeds get splutter ,add the red chili and curry leaves 
    • Pour the mix into the kadala curry.

    The Kadala curry is ready to have..Have it with Puttu.
    Points to ponder

    • If you like more spice add more green chili and chili powder
    • If you like to make more gravy add 2-3 cup of water .
    • Do not overcook the black chickpea.

    Sending this  to JIHVA-Breakfast event hosted by veggieplatter and the event started by Indira

      Thursday, March 25, 2010

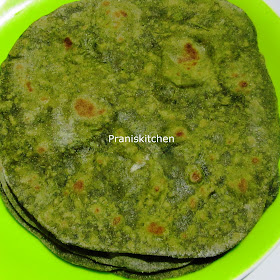
      Palak chapati/ Indian whole wheat Bread with Spinach


      You may wonder about this title - what is this "Palak chapati"?. Yes, today i am going to share with you a new dish called "Palak (spinach) chapati"...I think many of you may have tried and tasted this  dish. You know chapati itself is very nutritious. It is a very effective diet for weight control and cholesterol control. If you add the very healthy leafy vegetable - Spinach to it then there is no need to describe more about its nutritional effect.  Having the plain chapati  everyday is really boring, even if we try different combination of curries with it..But if u add some changes to the plain chapati..you can feel that it is something different..adding the changes means adding any additional ingredient. This palak chapati is a good choice for that kind of change.

      I got this idea from one of my friend..when she invited us for dinner she served this green chapati(i didn't know it was the palak chapati). I was so excited because i really loved the color and was quiet confused about how she made this green color. Many questions were going through my mind, whether she added some food color or added any special ingredient for this etc ..while tasting that i felt she added some vegetables but the color was still in confusion. At last I asked about this secret ingredient and she told me that it was Palak. I collected the recipe from her. I tried the dish in few days. I was so happy because for the first time, i prepared the green colored chapati.I usually prefer to serve it for guest because it is not a common dish. After started blogging I saw the recipe in so many fellow blogger s funny right:))

      If you have any left over dough after the preparation, wrap them into foil paper (or place it in a tight container) and keep it in the refrigerator for about a week..this would make your work easier..I like to mention one more thing,there is a chapati grill(I bought it from a nearby Indian grocery shop) While preparing it,Just place the chapati grill  in the stove top and place the half cooked chapathi and heat that, you can see how well it is puffing up. It will make the chapathi so softer and tastier. I think it will be available in almost all Indian grocery.if u get a chance buy that, it really helps to puff the chapathi.

      Hope u guys are also going to try this one, Once u try it, i can guarantee that  u will add it in your menu..one of the best meal u can prefer for kids because it is a very rich in vitamins. We had it with stew. It is a best combo with any non veg dish too. Ok let me talk about the preparation..

      Ingredients

      Wheat flour: 2 cup
      Maida Flour:1/2 cup(optional)
      Salt : to taste
      Water: to make the dough
      Oil: 1 tbsp
      Spinach:1/2 cup

      Preparation
      Step1: Cook the spinach until completely done.
      Step2: Make a nice paste of the cooked spinach.
      Step3: In a large sized bowl mix the wheat flour, maida flour salt spinach paste and oil together.
      Step4: Add water and mix it and make a dough with right consistency for the chapatti
      Step5: Cover the prepared dough with a wet cloth and keep it aside for 30 minutes to 1 hour
      Step6: Make medium lemon size balls from the prepared dough
      Step7: In a flat surface or flat wooden chapati maker roll them into circular shape.Add the flour while rolling it for not sticking to the surface
      Step8: Heat the pan ...Place the rolled dough and just heat up both side (30 sec - 1 min)
      Step9: Meantime place the chapati grill(mentioned above) on the stove top and  heat that and place the half-cooked chapati on it and cook. It will make the chapati so softer and tastier.

      The palak chapati is ready to serve.Have it with any of your favorite dish

       Points to ponder
      •  Do not add any water while cooking the palak..While grinding just add 1-2 tsp of water for getting a nice paste.
      •  Do not add more water while preparing the dough as because the palak paste have its own moisture ...
      • Here i used the frozen palak..If u r buying the bunch just take some and chop them into small pieces and then cook.
      • The maida flour  is an optional one.
      Hope this would be a good entry for the 'Healing Foods Event' hosted by Dilse and the event started by Suri

      Monday, March 22, 2010

      Mutton piralan/Mutton Roast/Lamb Roast


      Hope some of you guys get a chance to try my other mutton recipes. As my husband is a pure non-vegetarian, most of the days I used to prepare any of the non-veg dishes according to the availability. Today I prepared a new dish "Mutton Piralan (Mutton Roast)". Actually I got this recipe from one of the cookery show. It is a good combo with paratha or rice. We had it with paratha...My husband really loved it. As I got a good feedback from him,i thought i can share the recipe with all of you. Hope you could really enjoy having this and could get good feedback from your loved ones.

      Cost of the dish : 3.99$ /Pound
      Cooking time : 30-45 minutes


      Ingredients
      Mutton - 1 pound
      Pepper powder-1 tbs
      Garam Masla- 1 tsp
      Red chili powder -2tbs
      Garlic - 5 pods
      Salt - to taste
      Turmeric Powder-1/2 tsp
      Red Onion : 1 big size
      Tomato-1 medium
      coconut milk : 1/4 cup
      Water :1/4 cup

      Preparation
      Step1: Cut the onion into small pieces. Cut the tomato into 8 pieces..
      Step2: Make a nice paste of garlic,Pepper, garam masala, turmeric powder, chili powder and salt. (Keep half of the turmeric and chilli powder for onion masala. See Step6)
      Step3: Marinate the mutton with the above spice paste and keep aside for about 15-30 minute.
      Step4: Cook the Marinated mutton in a pressure cookder until well cooked (2 whistle).
      Step5: Heat oil in a pan, add the sliced red-onion. Fry until onions gets brown color.
      Step6: Add 2 crushed garlic pods and Turmeric Powder and Chili powder. Stir well.
      Step7: Add the Tomato into it. Once it gets sauted, add the cooked mutton pieces along with gravey into the onion mix.
      Step8: Cook it for about 10-15 minutes in meduim heat or until mutton get roasted with the masala.
      Step9: Add coconut milk and just cook it in very low flame for about 5 more minutes

      The Delicious Mutton Piralan is ready ...
      Cook's Tip:


      • Do not add more water for cooking the mutton. Allow mutton to cook in it's own moisture.
      • If you do not have coconut milk just grind the grated cocnut very nicely and take the milk by squeezing it (You can use a clean cotton cloth or strainer for this)..If you grind the coconut very nicely not necessary to strain that...
      • According to your taste increase the quantity of chili powder. 
      • Allow the gravy to settle in the roast make it more tender and tastier

        Saturday, March 20, 2010

        Kozhi Nirachathu/Stuffed Chicken


        Today I am going to share with you a very special dish, called "Kozhi Nirachathu"(Stuffed chicken)...It is a special Malabar dish (north Kerala) and mainly served on special occations. Frankly speaking, I didn't have any idea about this dish and we never had  a chance to taste it before...One day whne I was browsing through some blogs I got this recipe idea from Malabar spices. I am so happy to see this kerala style recipe because here in US, for Thanksgiving dinner, I can try this recipe instead of the turkey.. If you have it with paratha or chapathi it is perfect combo.otherwise you can have the chicken as the main course just with some salad and bread stick.
        If you like, you can make vegettable stuffing instead of egg...Next time I have to try with some potato..But this time I just followed the traditional way. Still I added some more vegetables for baking...Just try this one, sure you will try it again and again.. It is simple but it takes almost 3 hours to complete the whole cooking...But the dish is worth to our time .If u prepare this dish for guests sure they will ask for the recipe(if i like any dish i hardly forget to collect the recipe from them)
        When my husband comes from office, he directly goes to the kitchen and checks the dishes one by one which I prepare for dinner..and he usually tastes each dishes and gives his comments.Today i prepared this one, he really loved this dish - "Kozhi Nirachathu"...While seeing the dish he told me "Ok, let's have dinner now itself" (it was only 6:30PM :))..Such kind of comments make me so happy..I always like to surprise him by making different dishes ..
        Here in US, we can find the Rotisseri chicken (Grilled chicken) in almost all food store..Sometimes we used to buy that for our dinner..But that doen't have this kind of much massla (I mean kerala spicy) and stuffing..But today's chicken is really stuffed with our massla items...Because of the baking and frying the whole chicken gets that full flavor..So it is delicious..
        Let's talk about the preparation..

        Cooking time: 45 minutes
        Preparation time: 2 hours
        Cost of the item: 3.99 usd/Whole chicken

        Ingredients
        Chicken - 1 whole chicken

        For marinating the chicken
        Turmeric Powder: 1 tsp
        Chili powder:2 tbsp
        Salt: to taste
        Oil: 1 tsp

        For the stuffing
        Boiled egg: 2 nos
        Onion: 1 medium
        Tomato: 1 medium
        Garlic: 3 pods
        Ginger: 1 mediumsize
        Green chili: 2 nos
        Turemeric Powder: 1/2 tsp
        Chili Powder: 1 tsp
        Coriander Powder: 1 tsp
        Garam masala: 1tsp
        Coriander Leaves: little
        Curry leaves: 1 spring
        Cashewnut: 5 nos(optional)
        Raisins : 5 nos(optional)
        Kitchen thread : 2 thread

        For frying chicken
        Oil: 1/4 cup

        For the gravy
        Fennel seed : 1 tsp
        Onion: 1 medium
        Tomato: 1 medium
        Garlic: 3 pods
        Ginger: 1 mediumsize
        Green chili: 2 nos
        TuremericPowder: 1/2 tsp
        Chili powder: 1 tsp
        Garam masala: 1tsp

        For baking: 
        Capsicum: 1/2 portion
        Mushroom: 5 nos

        Preparation
        Step1: Clean the whole chicken. Apply some lemon juice while cleaning the chicken
        Step2: Make a paste of turmeric powder, chili powder, salt and 1 tsp of oil...marinate the chicken with this paste and keep the marinated chicken in the refrigerator for 1 hour


        Step3: Boil the eggs until it is fully cooked. While boiling the egg add 1 tsp of salt..It will help to prevent sticking shells on the boiled egg. Once the eggs are fully cooked transfer them into the cold water then peel off the shell and keep it aside
        Step4: Prepare the Stuffing
        1.Heat oil in a pan.Add the sliced onions (keep half of the onion slices for gravy) .
        2.Once the onions get brown color add the ginger-garlic paste and the green chili.Saute well
        3.Add tomato.Once the tomato get fried add the garam masala, turmeric powder and chili powder .Mix all together 
        4.Add the coriander leaves and curry leaves.
        5.Add the boiled egg into the mix and cook for 2 minutes in medium heat...
        6.Switch off the heat and transfer the content into a bowl and keep it for stuffing.


        Step5: Stuff the chicken with the above "egg-masala"
        Stuff the egg masala inside the chiken..Put the egg first then the onion masala.Do not try to over stuff. Tie together the chiken legs first then chicken wings using the kitchen threads.

        Step6:Fry the stuffed chicken
        Heat oil in the pan..Fry the chicken until all the four sides get light brown (not necessary to fully fry the chicken)


        Step7:Preheat the oven in 400F. Place the chicken in to the oven safe bowl..Place the breast side down .Add the veggies arround the chicken.Spray some  oil(used for frying the chicken). Bake it covered for 30 minutes ..Cover the bowl with an aluminium foil.


        Step8:Preparing the gravy
        1.Heat oil in the pan (use the same pan and oil used for frying the  chicken)...Add the onion once the oil get heated. Saute the onion for 2-3 minutes
        2.Add the ginger garlic paste and green chili.saute for some time
        3.Add the tomato.
        4.Make a nice powder of fennel seed.Add this into the onion mix..Add the turmeric powder chili powder garam masala ..Saute for 5 minutes .

        Step9
        Pour this gravy into the half baked chicken and bake it for another 20-30 minutes in 400F uncovered.

        The delicious Kozhi nirachathu is ready to have...


        Cook's Tip
        • You can add any vegettable.Here i used capsicum and mushroom..
        • You can use cashewnuts and raisins and cuscus also for stuffing...
        • If you want to make it spicy add more chili powder.
        • If you do not like to add the gravy just leave the final step.
        • If you do not like to use the oven, deep fry it in the oil for 30 minute in medium heat...
        • If u like u can buy the Cornish game hen,Its available in all grocery store..

        Thursday, March 18, 2010

        Pineapple Pachadi /Pineapple in Coconut Curd mix

        Today's special is a traditional kerala vegetable dish, Pineapple Pachadi(kaithachakka pachadi).It is one of the dish always serverd in Kerala feast (Sadhya)...We can use any fruit or vegettable for preparing this pachadi..Most commonly used items are Pineapple,Plantain banana, mango and pumkin etc..Usually we use the ripe fruit for this pachadi....The main ingredients are coconut mustard seed and curd. My mom used to prepare the pachadi without adding the mustard seeds. But my husband love the mustard  taste. What I am trying to say is that we can prepare this dish with or without using the mustard seeds. Both are considered as the pachadi dish. It is suggested that better to prepare the pachadi on previous night,that will make the dish more tastier for the next day (then only the pachadi will get full flavor)..Usually for the sadhya ,pickles pachadi and kichadi are preparing in the previous night..You may heard that for preparing Onam feast, usually ladies couldn't sleep on "Uthradam" night (the day before "Thiruvonam") because of the preparation of all these dishes and cutting the veggies and grating the coconut..Sadhya is incomplete with pachadi. Now it is the time to talk about the preparation steps of this Pineapple pachadi.
        Cooking time:15-20 minutes
        Cost of the item:1.99USD / 20oz can
        Ingredients

        Ripe Pineapple :1/4 portion cut into small cubes( I used the canned one)
        Turmeric Powder: 1 tsp
        Salt : to taste
        Green chili: 4 nos
        water: 1/2 cup
        Grated coconut: 1/4 cup
        Mustard seed: 1/2 tbs
        Curd : 1/2 cup
        Mustard seed: 1tsp
        Oil : 2 tsp
        Red hcili : 1 no
        Curry leaves: 1 spring

        Preparation
        Step 1  : Cook the pineapple chunks along with green chili, salt, turmeric powder and 1/2 cup of water.

        Step 2  : Make a very nice paste of coconut and Mustard seeds..
        Step3   : Add the above mix into the cooked pineapple..Stir well...Cook for 5 minutes in meduim heat..Let it cool down for sometime.

        Step4   : Mix curd into the cooked pineapple coconut mix.Mix well.
        Step5   : Heat oil in a pan, add mustard seed,once it started spluttering add the red chili and curry leaves...
        Step6   : Pour this into the pachadi..


        Pineapple pachadi is ready to serve.


        Points to ponder


        • Do not add more than 1/2 cup of water for cooking pineapple
        • If you are using the whole pineapple first cut them into slices and make meduim size cubes...
        • Do not use raw pineapple..
        • Do not Overcook the pineapple

        Tuesday, March 16, 2010

        Coriander Chicken roast/Malli Kozhi Piralal


        Today i am going to share with you a different non-vegetarian recipe -"Coriander Chicken Roast"...This is not a usual kerala style chicken roast.It is something different.The main ingredient for this is coriander seeds..Actually i got this recipe idea from Chef Lakshmi and she prepared this with mutton. I have already posted that Mutton dish here. While having this mutton dish my husband suggested me that why can't you  try this recipe with chicken..ya it was a good idea..finally i tried it with chicken ,as a result i got one more entry for the chicken recipe collections...About this recipe, it is very simple and quiet easy to prepare..Usually any non-veg cooking we have to  saute the ingredients for atleast 10 minutes in oil or butter but in this recipe it is not necessary to  saute anything. just add all the ingredients as fresh as its available..We named this dish as Coriander Chicken Roast...Hope all of you will try this recipe..I can guarantee that u will like the taste...

        Cooking time : 15-20 minute
        Cost of the item: 4.29 usd/whole chicken

        Ingredients

        Chicken: 1 pound
        Corriander seeds: 3 tbs
        black pepper seed: 1/2 tbs
        Cumin seed:1/2 tsp
        Turmeric Powder:1/2 tsp
        Kashmiri chili powder: 1 tsp
        Pearl onion : 15 nos
        Ginger : meduim sized
        Garlic : 6 pods
        Green Chili: 4 nos
        Fenugreek: 1/2 tsp
        Water: 1/2 cup
        For seasoning
        Oil: 1 tsp
        Pearl onion: 4 nos
        Curry leaves: 1 spring
        Coriander leaves : some

        Preparation
        Step1 : Grind coriander seeds,black pepper and cumin seed with turmeric powder and make a
        nice powder
        Step2: In a pressure cooker,add the chicken pieces with sliced pearl onions, splitted green chili , sliced garlic, ginger and fenugreek seeds .Mix all together and then add the above masala powder mix along with water...
        Step 3: Cook it until all the chicken pieces are well cooked or 2-3 whistle
        Step4: Heat oil in a pan..Add the sliced pearl onions ,saute well then add the curry leaves..
        Step5: pour this into the cooked chicken roast..Garnish with some cilantro
        The Delicious Coriander Chicken Roast is ready to have..Good Combo with rice.


        Cook's tip:
        • Do not add more than a cup of water...If you like to have more gravy u can add 1/2 cup to 1 cup of water..Chicken itself has lot of  moisture
        • Do not overcook the chicken...
        • If u do not have pearl onion just use red onion and dice them into very small pieces..
        This post is sending for the event of "cooking with seeds-Coriander seeds"hosted by Souras kitchen and Priya'seasyntastyrecipes

        Monday, March 15, 2010

        Vazhakoombu Thoran/Banana flower Thoran

        Today i am going to share you  one of the traditional kerala dish that is none other than one of our favorite dish vazha koombu thoran. vazhakoombu (banana flower)has different names as vazha choondu, vazhaipoo, ariti poo(Telugu), mocha(Bengali),balle hoovu (Kannada), kele ka phool(Hindi).It is a very healthy dish to eat.Here in usa it is not available at all time..but sometime we can find this in indian grocery shops or  chineese groceriy shops. In kerala, i think everyone has at least one or two banana plants at their backyard ..Usually all the part of this plant is useful for one or the other purposes..the leaves,stem,the flower and banana (ripened and raw ). I  always love to watch the time the banana flower is coming out from the banana plant. Everyday the bracts are coming out and we can see the flowers and within days the flowers become bananas..What a wonderful process and seeing the different stages of growing this is really a wonderful experience..Whenever I get chance, I love to have the sweet  honey coming from the flower threads, that's one of the joyful experience I ever had......Another thing is the vazhakoombu thoran that mom used to prepare at home...some of these tastes always brings us back to home...nostalgic ...

        Last time when i saw the banana flower in the indian grocery shop,i thought of buying it and i thought i can share the recipe with all of you..most of the people may think it is a very tough job to do cleaning and chppong  the flower..but frankly speaking,it is not that difficult . it is so simple as we do with other vegetables. Just wash the  whole banana flower in running water and  peel off the 2-3 outer sepals. The color of the bract will change from dark maroon to a light maroon color after removing the 2-3 bracts..and the flower will be more tendered inside..That is good for cooking..that won't give the bitter taste to the dish. I used those sepals for serving the thoran..(just for the presentation). Finely chop the flower into small pieces (if you have a large stainless steel vegetable grater, you can use that)...Wash these in water (with a pinch of salt )and strain out..Add some turmeric powder and salt and keep it aside for 5-10 minutes...and also ..Hope all of you will try this traditional kerala vazhakoombu thoran...
        Cost of the item : 1.49 usd/pound
        Cooking time: 20-30 minutes

        Ingredients:
        Banana flower:1 no
        Sprouted mung dal: 1/4 cup
        grated coconut: 1/4 cup
        cumin seed :1/2 tsp
        Garlic pod: 1 pod
        Pearl Onion: 4 nos
        Green chili :3 nos


        For seasoning:
        Oil :1 tsp 
        Mustard seed:1 tsp
        Black gram: 1 tbs
        Dry Red chili: 1 no
        Curry leaves: 1 spring

        Preparation:
        Step1: Mix the  finely chopped (grated) banana flower and the sprouted mung dal in a cooking pan add some water and cook for 5-10 minutes in medium heat
        Step2: Make a coarse paste of coconut ,cumin seed, Garlic, pearl onion and green chili .add the mix into the cooked  flower-mung dal mix.
        Step3:Mix well then close the pan and  cook the mix for another 4-5 minutes.
        Step4: Heat oil in a pan,add the mustard seeds ,once it started spluttering add the black gram(urad dal),once it get light brown color add the dry red chili and curry leaves...pour this into the cooked banana flower thoran...

        The delicious thoran is ready to serve. Have it with rice

         Cook's tip
        • If you use mung dal soak it in water for 4-5 hours and cook it separately in a cooker then only add with the chopped banana flower...If u use sprouted not necessary to cook it separately.
        • do not add more water for coking the flower..the flower itself have enough moisture .
        • If you like to make this spicy add 4-5 green chilies

        Saturday, March 13, 2010

        Tindora /Kovakka Palya(Dried Coconut curry)

        Today I am going to share a different dish,it is a karnataka cuisine called Palya...It is a different version of kerala style thoran..The taste is really good as thoran ..Good with rice and roti.We can use any kind of vegetable for the preparation of this palya..Here i used tindoora ( kovakka) for this dish. I have already posted the kerala dish -tindora thoran..
        Tindora is available in almost all indian grocery shops...It is known in different names in difeerent places in india,for example in malyalam it's kovakka; in tamil it's kovakkai; dondakkaya in kannada; tondli in marathi etc..Some times it is referred as baby watermelon or little gourd becasuse of its shape...
        Whenevr i prepare the kovakka dish it brings me to the days I spent in my cousine sister's home because i started eating the dish from her home only..My amma's sister's kovakka mezhukkupiratti and thoran were mouth-watering dishes. In almost all summer vacation we used to visit her home..there my cousuin sisters had their own kitchen garden and had variety of vegetables..that days we used to get all vegetables from their garden  itself...The kovakka was one of them..Picking the kovakka itself had lots of fun...I miss those wonderful days..at first i was not that fond of tindora but  i don't know once i started eating that i really loved that vegetable dishes..May be my valiyamma's kaipunyam is in that dish... 
        My husband used to ask me whether I  addicted to this tindora because whenever we visit the indian grocery i want buy this vegetable...In Indian store I usually can see the crowd around tindora, brinjal and okra  sections..really it is a very demanded vegetable for all Indians..all state have their own unique dishes with this vegetable...I used to prepare tindora mezhukkupiratti because my husband doesn't like the thoran ,when I prepared this dish he said it has more taste compared to the thoran.
        Anyway, let me talk about the preparation..Hope you will  also try this tindora palya..

        Cost of the item 0.99usd/pound
        Cooking time: 20 minutes

        Ingredients:
        Tindora : 1 pound
        Turmeric powder: 1/2 tsp
        Water: 1/4 cup
        Garlic: 2 pods
        Redonion: 1 medium size
        Tomato: 1 small
        Green chili : 3 nos
        Grated Coocnut : 1/4 cup
        Salt : to taste
        Sugar: 1/2 tbs
        Oil : 2 tbs
        Mustard seeds: 1/2 tsp
        Bengal gram(kadalaparippu): 2 tbs
        Lemon juice: 1/2 tsp

        Preparation

        • Cut the kovakka into small size,lengthwise or round shaped...What i did is i cut them lengthwise  into 4 made halves of them..
        • Cook the kovakka with turmeric powder until kovakka get completely cooked..Be careful don't overcook it..so add water carefully 
        • Heat oil in apan,Add mustard seeds once its started spluttering add the Bengal gram.
        • Once the dal get slight brown color add the crushed garlic...then add the diced red onion, splitted geen chili and tomato.Saute well.
        • Add the turmeric powder and fry until the onions get brown color..In between add the sugar. Saute well.
        • Add the cooked kovakka into the mix..stir well..
        • Add the grated coconut into the whole mix and stir well..cook for 2 minutes..
        • Sprinkle the lemon juice ..Switch off the heat..
        • Garnish it with corinder leaves
        The delicious Kovakka Palya is ready to have..

        Cook's tip:
        1. Do not overcook the kovakka...It will spoil the entire dish 
        2. Do not add more sugar.and lemon juice..